Getting Started
Webxdc brings web apps to messenger chats, in a simple file format containing HTML5, CSS, JavaScript and other asset files. All authentication, identity management, social discovery and message transport is outsourced to the host messenger which runs a webxdc app container file and relays application update messages between app users, letting each app inherit offline-first and end-to-end encryption capabilities implemented by the hosting messenger.
A simple example
The e-mail based Delta Chat and the XMPP-based Cheogram messengers support webxdc apps, which run on both messengers without any change.
The following index.html shows a complete webxdc app, with an input field shown on all peers. Data submitted from the input is delivered to all members of the chat.
<!DOCTYPE html>
<html>
  <head>
    <meta charset="utf-8"/>
    <script src="webxdc.js"></script>
  </head>
  <body>
    <input id="input" type="text"/>
    <a href="" onclick="sendMsg(); return false;">Send</a>
    <p id="output"></p>
    <script>
      function sendMsg() {
        msg = document.getElementById("input").value;
        window.webxdc.sendUpdate({payload: msg}, 'Someone typed "'+msg+'".');
      }

      function receiveUpdate(update) {
        document.getElementById('output').innerHTML += update.payload + "<br>";
      }
      window.webxdc.setUpdateListener(receiveUpdate, 0);
    </script>
  </body>
</html>
To package the app as a .xdc file, zip the directory containing the index.html:
zip -9 --recurse-paths "myapp.xdc" PATH_TO_DIR
Now it's possible to share the myapp.xdc file in any chat: recipients can hit "Start" to begin using the app to enter text in this input field and send updates to each other.
To simulate multiple chat participants in the browser, try Hello as a minimal example; it includes everything needed to run the app and requires no build systems.
The webxdc-dev simulation tool is the recommended
tool for developing webxdc apps as it allows multi-user simulation,
and allows observing network messages between app instances.
However, no messenger is required to develop a webxdc app with the webxdc-dev tool.
More examples
webxdc on Codeberg and webxdc on GitHub contain curated webxdc app examples.
The webxdc store contains working webxdc apps that you can use today. Each app comes with a "source code" link so that you can learn and fork as you wish. You can submit your own available FOSS app for inclusion into the curated store.
Useful background for developing webxdc apps
Webxdc app development and deployment is fundamentally easier than developing for and maintaining an application-specific always-online HTTP server. But there are undeniably complications in arranging consistent web app state across user's devices, a typical issue for any Peer-to-Peer (P2P) networking system. Even if you don't study the topic in depth, reading Shared web application state introduces you to the terminology and some necessary considerations, with a particular eye on webxdc and providing practical guidance.
Participating in developments
-
Support Forum: the webxdc category on the DeltaChat forum is a space to ask questions and announce your app projects. Log into the forum via DeltaChat, Github, or by creating a username and password there.
-
If you have any question about Webxdc support in the XMPP-based Cheogram messenger, head over to the Cheogram forum channel
-
Announcements: Delta Chat and Webxdc-related developments can be followed on Fediverse
Webxdc Specification
The webxdc specification covers three areas:
-
.xdccontainer file format describes zip-file format with manifest and icon files. -
Javascript API specifies a minimal stable API that all webxdc apps can use.
-
Messenger implementation specifies how messenger run webxdc apps in isolated web views.
Webxdc Container File Format
- a Webxdc app is a ZIP-file with the extension
.xdc - the ZIP-file MUST use the default compression methods as of RFC 1950, this is "Deflate" or "Store"
- the ZIP-file MUST contain at least the file
index.html - the ZIP-file MAY contain a
manifest.tomlandicon.pngoricon.jpgfiles - if the webxdc app is started,
index.htmlMUST be opened in a restricted webview that only allows accessing resources from the ZIP-file.
The manifest.toml File
If the ZIP-file contains a manifest.toml in its root directory,
the following basic information MUST be read from it:
name = "My App Name"
source_code_url = "https://example.org/orga/repo"
-
name- The name of the webxdc app. If no name is set or if there is no manifest, the filename is used as the webxdc name. -
source_code_url- Optional URL where the source code of the webxdc and maybe other information can be found. Messenger implementors may make the url accessible via a "Help" menu in the webxdc window.
Icon Files
If the ZIP-root contains an icon.png or icon.jpg,
these files are used as the icon for the webxdc.
The icon should be a square at reasonable width/height,
usually between 128 x 128 and 512 x 512 pixel.
Round corners, circle cut out etc. will be added by the implementations as needed;
do not add borders or shapes to the icon therefore.
If no icon is set, a default icon will be used.
Webxdc Javascript API
Webxdc apps are shared in a chat and each device runs its own instance on the recipients device when they click "Start". The apps are network-isolated but can share state via sendUpdate() and setUpdateListener().
Messenger implementations expose the API through a webxdc.js module. To activate the webxdc API you need to use a script reference for webxdc.js in your HTML5 app:
<script src="webxdc.js"></script>
webxdc.js must not be added to your .xdc file as they are provided by the messenger. To simulate webxdc in a browser,
you may use the webxdc.js file from Hello,
or use the webxdc-dev tool which
both allow to simulate and debug webxdc apps without any messenger.
sendUpdate
window.webxdc.sendUpdate(update, descr);
Send an update to all peers.
-
update: an object with the following properties:update.payload: string, number, boolean, array, object ornull. MUST NOT beundefined. Everything that is not JSON serializable will be skipped, this especially affects Binary data buffers as used inFile,Blob,Int*Arrayetc.; if needed, use eg. base64.update.info: optional, short, informational message that will be added to the chat, e.g. "Alice voted" or "Bob scored 123 in MyGame". Do not add linebreaks; implementations will truncate the text at about 50 characters or less. If there are series of info messages, older ones may be dropped. use this option sparingly to not spam the chat.update.document: optional, name of the document in edit (eg. the title of a poll or the name of a text in an editor) Implementations show the document name e.g. beside the app icon or in the title bar. MUST NOT be used if the webxdc does not create documents, e.g. in games. Do not add linebreaks; implementations will truncate the text at about 20 characters or less.update.summary: optional, short text, shown beside the app icon; it is recommended to use some aggregated value, e.g. "8 votes", "Highscore: 123". Do not add linebreaks; implementations will truncate the text at about 20 characters or less.
-
descr: short, human-readable description what this update is about. this is shown e.g. as a fallback text in an e-mail program.
All peers, including the sending one,
will receive the update by the callback given to setUpdateListener().
There are situations where the user cannot send messages to a chat,
e.g. if the webxdc instance comes as a contact request or if the user has left a group.
In these cases, you can still call sendUpdate(),
however, the update won't be sent to other peers
and you won't get the update by setUpdateListener().
setUpdateListener
let promise = window.webxdc.setUpdateListener((update) => {}, serial);
With setUpdateListener() you define a callback that receives the updates
sent by sendUpdate(). The callback is called for updates sent by you or other peers.
The serial specifies the last serial that you know about (defaults to 0).
The returned promise resolves when the listener has processed all the update messages known at the time when setUpdateListener was called.
Each update which is passed to the callback comes with the following properties:
-
update.payload: equals the payload given tosendUpdate() -
update.serial: the serial number of this update. Serials are larger0and newer serials have higher numbers. There may be gaps in the serials and it is not guaranteed that the next serial is exactly incremented by one. -
update.max_serial: the maximum serial currently known. Ifmax_serialequalsserialthis update is the last update (until new network messages arrive). -
update.info: optional, short, informational message (seesendUpdate()) -
update.document: optional, document name as set by the sender, (seesendUpdate()). Implementations show the document name e.g. beside the app icon or in the title bar. There is no need for the receiver to further process this information. -
update.summary: optional, short text, shown beside icon (seesendUpdate())
Calling setUpdateListener() multiple times is undefined behavior: in current implementations only the last invocation works.
sendToChat
let promise = window.webxdc.sendToChat(message);
sendToChat() allows a webxdc app to prepare a message
that can then be sent to a chat by the user.
Implementations may ask the user for a destination chat
and then set up the message as a draft,
so it is clear that the outgoing message is a result of some user interaction.
message is an object with file, text or both set:
-
message.file: file to be sent, setnameand one ofblob,base64orplainText:message.file.name: name of the file, including extensionmessage.file.blob: JavaScriptBlob, also accepts inherit types likeFilemessage.file.base64: base64 encoded datamessage.file.plainText: text for textfile, will be encoded as utf-8
-
message.text: message text to be sent
The text can usually be modified by the user and the user may decide to send the text without the file or abort sending at all. These user decisions are not reported back to the webxdc app.
To let the user focus on sending the message, calling this function may pass control back to the main app and exit the webxdc app. The promise may or may not be resolved before exit.
In case of errors, the app will not exit and the promise will be rejected.
Example:
window.webxdc.sendToChat({
    file: {base64: "aGVsbG8=", name: "hello.txt"},
    text: "This file was generated by GreatApp"
}).catch((error) => {
    console.log(error);
});
Notes:
-
To send and empty file, set an empty string or blob as data. Not setting any data is an error. This is also important for messenger implementors, that need to check for eg.
typeof message.file.base64 === "string"and not!message.file.base64, which would not allow empty files. -
If you want to send text don't use
btoa(), rather usemessage.file.plainTextdirectly, becausebtoa()has problems with some unicode/emojis
importFiles
let files = await window.webxdc.importFiles(filter);
importFiles() allows a webxdc app to import files.
Depending on platform support, this just opens the system file picker or a custom one.
This custom file picker should show recent attachments that were received and sent,
to make importing of a file that you just received from someone easier
(you don't need to save it to the file system first),
but it also still shows a button to open the system file picker.
filter: an object with the following properties:filter.extensions: optional - Array of extensions the file list should be limited to. Extensions must start with a dot and have the format.ext. If not specified, all files are shown.filter.mimeTypes: optional - Array of mime types that may be used as an additional hint eg. in case a file has no extension. Files matching eitherfilter.mimeTypesorfilter.extensionsare shown. Specifying a mime type requires to list all typical extensions as well - otherwise, you may miss files. See https://developer.mozilla.org/en-US/docs/Web/HTML/Attributes/accept#unique_file_type_specifiers for details about the format.filter.multiple: whether to allow multiple files to be selected, false by default
The method returns a Promise that resolves to an Array of File-Objects.
Example:
// then/catch
window.webxdc.importFiles({
  mimeTypes: ["text/calendar"],
  extensions: [".ics"],
}).then((files) => {
  /* do sth with the files */
}).catch((error) => {
    console.log(error);
});
// async/await
try {
  let files = await window.webxdc.importFiles({
    mimeTypes: ["text/calendar"],
    extensions: [".ics"],
  })
  /* do sth with the files */
} catch (error) {
  console.log(error);
}
selfAddr & selfName
selfAddr
window.webxdc.selfAddr
A string with an unique ID identifying the user in the current webxdc. Every user of an webxdc must get a different ID and that ID must be the same if the webxdc is started again later for the same user. The same user in different webxdc, however, may have different IDs.
Especially useful if you want to differentiate between different peers -
just send the ID along with the payload,
and, if needed, compare the payload addresses against selfAddr later on.
selfName
window.webxdc.selfName
Name of the current account, as defined in settings. If empty, this defaults to the peer's address.
Messenger Implementation for Webxdc Apps
This section describes requirements and guidance for messenger implementors to add support for their users to run and interact with webxdc apps. Webxdc apps are attached to a chat message using the container file format, and they can be "started" on all receiving devices of the chat message. Each such chat message constitutes a separate "webxdc app". The same webxdc container file shared in two separate chat messages will be regarded as two separate "webxdc apps" and the two apps can not communicate with, or even know about, each other.
Webview Constraints for Running Apps
When starting a web view for a webxdc app to run, messenger implementors:
-
MUST run the webxdc container file in a constrained, network-isolated webview that MUST deny all forms of internet access. If you don't do this unsuspecting users may leak data of their private interactions to outside third parties. You do not need to offer "privacy" or "cookie" consent screens as there is no way a webxdc app can implicitly transfer user data to the internet.
-
MUST allow unrestricted use of DOM storage (local storage, indexed db and co), but make sure it is scoped to each webxdc app so they can not delete or modify the data of other webxdc content.
-
MUST inject
webxdc.jsand implement the Webxdc Javascript API so that messages are relayed and shown in chats. -
MUST make sure the standard JavaScript API works as described at Other APIs and Tags Usage Hints.
In "Bringing E2E privacy to the web" Delta Chat developers discuss the unique privacy guarantees of webxdc, and which mitigations messengers using Chromium webviews need to implement to satisfy them.
UI Interactions in Chats
-
Text from
update.infoSHOULD be shown in the chats and tapping them should jump to their webxdc message -
The most recent text from
update.documentandupdate.summarySHOULD be shown inside the webxdc message, together with name and icon. Only one line of text SHOULD be shown and truncation is fine as webxdc devs SHOULD NOT be encouraged to send long texts here. -
A "Start" button SHOULD run the webxdc app.
Example Messenger Implementations
Shared Web Application state
In a typical multi-user web application, clients download the app's source from a central HTTP server and rely on it to relay messages to others. In this client-server model, the server can leverage its central position of authority to ensure that all connected clients receive messages in the same order.
Even though webxdc applications can be used in situations where all members of a given chat are hosted by a single server, the specification does not assume this will be the case and in fact is intended to support both federated (multi-server) and fully peer-to-peer modes of operation. In addition, webxdc supporting messengers that implement offline-first messaging induce arbitrary delays in message delivery. Different clients may thus receive updates in very different orders, and consequently apply those updates in sequences that produce conflicting outcomes.
There are a variety of strategies and technologies for either avoiding or resolving such conflicts. The webxdc specification is deliberately agnostic about their use, allowing app authors to choose the approach which is most appropriate for their needs.
This chapter will:
- describe common ways in which state can become desynchronized in a peer-to-peer context
- provide an introduction to CRDTs (Conflict-free Replicated Data Types) and illustrate under what circumstances their use is beneficial
- demonstrate how to adapt an application to use CRDTs to consistently synchronize shared state between multiple users or devices using practical examples
Detecting conflicts
Modifications to shared state can be considered conflicting when two conditions are met:
-
They affect an overlapping section of a data structure, such as if two users both try to set the title of the same todo-list item
-
They are concurrent - meaning that the participants in the system cannot conclusively determine the order in which they occurred
Concurrent updates which affect unrelated data can be resolved without issue, as can sequential updates to related data.
Concurrency can effectively be ignored from a client's perspective in schemes that use a central server with online clients. Centralized web apps using an always online central HTTP server are a popular example of this model. Centralized HTTP servers can not only guarantee a total order of messages but they can also authoritatively resolve conflicts and provide the single "source for truth" for all associated web apps running on their client devices. In a decentralized messaging model, and in particular with end-to-end encrypted messaging, both a Total Order of messages and a "single source of truth" can not be assumed.
Conflict resolution in webxdc applications
Many webxdc applications are incapable of producing conflicts, either because they do not use the network communication APIs, or because any given data structure can only have one writer. For example, many of the available webxdc games offer a high-score table and how users scored will typically be reported back to the chat. Such a gaming app will simply post their user's highscore and everybody will collect all arriving highscore data and show it to their users in a sorted list. There is hardly any problem if a message is lost or messages get re-ordered. Eventually everybody will see roughly the same highscore list. It is worth considering that the webxdc host application might permit a single user to use multiple devices. For example, a password-manager webxdc app could be used in a "Saved Messages" or "Self-messages" chat so that only a single user's devices will share the application state. Such a multi-device setting already constitutes a minimal P2P system where total message ordering can not be guaranteed and there is no single source of truth.
Webxdc applications can use webxdc.sendUpdate()
and setUpdateListener
to send and receive data to and from other devices.
It then is necessary to provide some mechanism
through which all clients can determine a total order for all updates,
or can otherwise arrive at a shared consistent view on different devices,
once all messages have been delivered.
A complete solution for this is non-trivial,
but there are relatively simple mechanisms which can provide
a partial ordering for updates.
Partial ordering
It can be tempting to add a timestamp to each update and to order them by this value. Computers can have inaccurate physical clocks, however, so relying on them to order messages can be problematic, potentially resulting in messages that appear to come from the impossibly distant past or future. At a more theoretical level, time is an entirely subjective measurement, so there are fundamental flaws with this approach even with perfectly reliable atomic clocks.
Logical clocks are a more reliable option that make it possible to order the majority of events under normal circumstances. For example, Lamport timestamps include a sequence number in every update, and increment its counter to one more than the largest known value. Multiple messages with the same sequence number can then be taken as an indication of concurrency.
This method is popular both for its relative simplicity and the small amount of overhead that it introduces. For example, it is used by Yjs, which will be discussed later in this chapter.
Another popular approach which is more explicit but less compact involves the use of cryptographic hash functions. Instead of a single counter, messages include a list of hashes of the preceding messages which were known at the time the message was authored. This makes it possible to detect when a message has not been delivered or if message history has somehow been altered (although the latter probably isn't a concern with webxdc apps). Variations of this technique are applied in Git, BitTorrent, Bitcoin, Matrix, Secure Scuttlebutt, IPFS, and many other protocols intended to solve a variety of problems.
Either of these general techniques convey a notion of causality. Techniques to resolve conflicts can be computationally expensive, or can require manual human intervention. Tracking causality and ruling out conflicts are an effective first line of defense in peer-to-peer systems where messages are not guaranteed to be ordered.
With the knowledge of how conflicts can occur in distributed systems, and some basic techniques to reduce their frequency, we can now move on and introduce an evolving technology designed to eliminate them entirely.
Theory of Conflict-free Replicated Data Types (CRDTs)
The previous section described the circumstances under which updates to shared state can conflict, and introduced some techniques used to identify such conflicts. This section will present Conflict-free Replicated Data Types, a technology that automatically resolves such changes without the need for a central authority. It will define the specialized terminology which seems to keep many from adopting CRDTs, provide some basic examples, lay out clear expectations of what they can and cannot accomplish, and hopefully prepare you to avoid concurrency-related bugs and enjoy the benefits of offline-first applications.
Terminology
Just like in the conventional sense of a Data Type, a CRDT can be defined by the set of its possible values, the set of valid operations on those values, and low-level representation of them. There are often many ways to represent the same information. Knowing the range of possible values and the exact operations required for your particular use case will help you choose the most effective design for the job.
CRDTs go further than the basic data types that are included in almost any programming language in that they are designed to be replicated across multiple processes. These processes might run on the same machine, but are more commonly spread across a network. To accomplish this they generally define additional methods to track the state of remote peers, deliver the minimal set of updates those peers lack, and to indicate which updates are known so that other peers can perform the same services for us.
Most importantly, CRDTs are conflict-free, meaning that they are designed to handle every possible combination of concurrent operations for a given data type in a deterministic way. The states of peers can diverge temporarily, but a CRDT guarantees eventual consistency, that any two peers that are aware of the same set of updates will converge to have the same state.
Examples
A tally (or count) is relatively simple to implement compared to many other data types. If two people want to count the number of books on two shelves, they can each count one of the shelves and then sum their results. They could also call out numbers on an ongoing basis, adding both their own discoveries and those they hear to a mental sum. It doesn't matter in what order values are recorded because addition is commutative, at least for simple numbers. The important thing to understand is that despite any superficial similarity, a tally differs from a number because a number supports many operations which cannot be applied in any order. By choosing to only support addition it can be guaranteed that all peers' tallies will converge on the same final value.
For a slightly more complex version of a tally
we can consider a situation in which the organizers of a festival
must ensure that none of its zones exceed their maximum safe occupancy.
A tally of the number of attendees in every zone can be kept
by recording the number of people passing through entrances and exits.
Rather than assuming that all additions pertain to a single value as in the last example,
we can modify our operation to specify
both the relevant zone and the change in occupancy.
Thus, as three people move from zone A to zone B,
the checkpoint can record two events (update('A', -3); update('B', 3)).
As long as all checkpoints for a given zone
are able to communicate with each other with relatively little delay
then they should be able to use the information available to them
to decide whether to admit additional participants through their checkpoint.
These examples describe very basic CRDTs with narrowly scoped problems. If you have such a problem that maps well to a commutative operation then it might be worthwhile to design a specialized CRDT to solve it, and it may be reassuring to know that these data structures do not always require much complexity.
In practice the order of applications will matter, especially when dealing with data structures like lists or arrays. If two concurrent operations append items to the end of a list then it's reasonable to insert them in an arbitrary sequence. For example:
- Alice and Bob both try to add elements to their local copies of an empty list (
let list = [])- Alice does
list.push(5) - Bob does
list.push(7)
- Alice does
- When they become aware of each others edits it would be valid to automatically resolve the concurrent changes as either
[5, 7]or[7, 5], at least under most circumstances - Now, if Charlie comes along, learns of both changes, and then tries to append yet another item, most would expect it to be added to the end:
- Charlie does
list.push(11)
- Charlie does
- Valid outcomes are either
[5, 7, 11]or[7, 5, 11]
As described in the last section of this chapter, there are techniques to differentiate between these two types of circumstance, identifying which operations are concurrent or consecutive. In order to automatically resolve such conflicts when concurrent operations do occur, such types must also define deterministic strategies to allow all participants to choose the same ordering out of a set of all possible options. Different CRDT libraries may use different resolution strategies, but in most cases the choice of mechanism is essentially arbitrary as long as it meets some basic conditions.
Expectations
CRDTs are a very broad class of data structures with wide variety of possible implementations, even for superficially similar types. What they all have in common is a guarantee of eventual consistency, that all participants in a system will agree on the final state of the structure as long as they are all aware of the same set of updates. All updates will be merged automatically, regardless of their order or the degree to which they intersect.
With that said, whether or not the structure's final state matches
the expectations of those using the application is a matter of design.
If two peers concurrently increment a number from 5 to 6,
one system might decide that the two peers agree the new state should be 6,
while another might consider it appropriate to increment twice to 7.
In the event that one of the basic data types of a general-purpose CRDT like Yjs does not match your expectations the library may still be suitable for your use. Different behaviours can be accomplished by composing the built-in types into more complex ones. Yjs will treat concurrent changes to a number as two assignments. If you prefer for them to be treated as increments then you can instead encode each addition as a new member of an array of numbers to be summed. The higher-level value can then be derived from the array whenever it is required, while the lower-level representation serves as a simplified way to achieve consistency. It is common for collaborative applications built on CRDTs to follow this sort of schema pattern, in which user actions are translated into operations on the shared state, with remote changes propagating back to the UI.
A well-designed CRDT will handle all aspects of ordering messages, including the internal implementation of a logical clock, the detection of concurrency, and the resolution of overlapping changes. This enables peers to queue updates while entirely offline, and to merge their local state with others' when they are once again able to communicate. While this behaviour can be very helpful for application developers, it may not free you entirely from having to think about network conditions. Eventually-consistent application state should generally be treated as subjective, which can be a significant shift if you are used to having a server acting as an authority. That means that conditional behaviour that you'd usually treat as yes and no, may instead behave more like currently and not yet.
This section has discussed attributes of CRDTs that are mostly theoretical. The next section will give more concrete examples using Yjs, with a particular focus on how it can be used to accomplish common goals within webxdc applications as implemented in existing webxdc platforms.
Practical CRDT usage
If you've read the previous two chapters then you should already have a good understanding of what a CRDT is, and the circumstances under which they can be helpful tools. Otherwise, if you're not interested in the theory and prefer to just jump in with tangible examples then this page is for you. We'll focus on Yjs and particularly how it can be integrated into a webxdc app.
What is Yjs?
Yjs is a widely used CRDT library written in JavaScript which supports a number of complex data types, including Arrays, Maps, Text (including rich text, not just strings), and XML. It is highly efficient compared to many other CRDTs in terms of space (disk and memory usage), time (the computational effort required to formulate a new update or apply one authored by a remote client), and network transmission cost (the size of updates sent to other clients over the internet).
Yjs is designed to be network agnostic, meaning that it doesn't care whether it is reliably online, or how one client's device might connect to that of another when a network connection is available. Normally this would mean that it is the app author's responsibility to provide connectivity between the library and remote clients, but Yjs supports the use of Providers which manage the complicated details of that process. For webxdc app authors, there is already a webxdc Yjs provider available. In addition to simplifying initial app development, the use of providers makes it easier to port apps to other platforms, or to port existing Yjs-based apps to webxdc.
The library is available under the terms of the highly permissive MIT license, meaning that it can be easily included in any webxdc app whether the source is public or not.
How does it work?
The core of each Yjs-based application is its document:
import * as Y from 'yjs';

const ydoc = new Y.Doc();
Whenever this document changes it will emit update events.
Before you make any local changes
it's important to set up an event listener to handle these updates.
ydoc.on('update', (update) => {
    console.log(update);
    /* send the emitted update to remote clients */
});
Encoding updates and handling delivery
Updates are encoded as
Uint8Arrays,
a form of TypedArray
which can only contain 8-bit unsigned integers
(whole numbers between 0 and 255) as elements:
Uint8Array(20) [
    1,   1, 253, 161, 163, 244,  12,
    0,   8,   1,   5, 111, 114, 100,
  101, 114,   1, 125,   5,   0
]
In some circumstances this could sent over the network in binary format, but webxdc updates do not permit binary data in their payloads. This makes it necessary to convert it to a serializeable string format like Base64. Conversion can be done with an npm module like js-base64, or via the following snippets taken from the MDN web docs:
function base64ToBytes(base64) {
    const binString = atob(base64);
    return Uint8Array.from(binString, (m) => m.codePointAt(0));
}

function bytesToBase64(bytes) {
    const binString = String.fromCodePoint(...bytes);
    return btoa(binString);
}
So, an update can be handled like this:
ydoc.on('update', (update) => {
    const base64 = bytesToBase64(update);
    webxdc.sendUpdate({
        payload: base64,
        info: 'A new update for your Yjs app',
    }, 'Yjs update');
});
The app will also need a corresponding listener to load your past updates and handle incoming events from other clients in real-time.
webxdc.setUpdateListener((update) => {
    const decoded = base64ToBytes(update.payload);
    Y.applyUpdate(ydoc, decoded);
});
The underlying transport for webxdc apps typically introduces some size overhead, and Yjs is able to save space when several updates are bundled together into one, so sending an update for every minor change is inefficient. These snippets are given as examples to help understand how Yjs-based webxdc apps work, but for practical usage you will probably want to use the y-webxdc provider which maintains a queue of updates which are periodically bundled together and sent as a single update.
Using shared types
A Yjs document is essentially a collection of all the shared types that your app will need to replicate between peers. Once your document has been instantiated and connected to webxdc you can start adding data to it.
Arrays
The snippet below creates a Yjs Array which is similar but not identical to a normal JavaScript array.
// myList is a reference to a named part of the top-level Yjs document
const myList = ydoc.getArray('myList');

// pushing to the array modifies it and triggers an update
myList.push(['a', 'b']);
Suppose the above changes were triggered by one client (Alice), while another (Bob) pushed some different values to the array at the same time:
const myList = ydoc.getArray('myList');
myList.push(['c']);
Both clients attempted to push their changes onto the end of an empty array. Alice pushed her two strings as a single action, so it's clear that she intends for those two items to be adjacent. Bob pushed only a single item.
It is possible to apply both of these operations, however, it's ambiguous which should be applied first. Yjs resolves such changes using the relevant clients' client ids (randomly self-assigned integers) to break ties. Depending on their client ids, the result will be either
['a', 'b', 'c']
...or
['c', 'a', 'b']
Maps
Yjs is described by its author as a Sequence CRDT, meaning that all of its shared types are internally represented as sequences of values. That might be relatively intuitive for Arrays, but it's much less obvious how a Map might be implemented with that underlying representation. The explanation is that each value in a map is stored as its own sequence, with the surface-level value derived from the final element of the sequence.
Yjs Maps are defined in a similar manner as arrays:
const mymap = ydoc.getMap('mymap');
...from here, Alice and Bob can make concurrent changes to their local maps:
// Alice makes two consecutive changes

mymap.set('value', 'a');
mymap.set('value', 'b');
// Bob makes a single change to the same attribute on his map
mymap.set('value', 'c');
As with the previous array example,
Yjs can determine from context that
Alice's two successive values have a meaningful relationship,
namely that she intended for "b" to replace the previous value of "a".
When arranging these values in a sequence,
it will therefore ensure that they remain adjacent
and that their order is preserved.
As before, there are then two equally valid arrangements,
and Yjs can arbitrarily decide which to choose
based on their authors' client IDs, either:
['a', 'b', 'c']
...or
['c', 'a', 'b']
The final value of mymap.value will therefore be the last element
of either of these sequences ('c' or 'b').
Text
The Yjs Text type once again differs from the native JavaScript String type. It is intended to represent not just plain text, but rich text with very complex formatting.
As with all other types, Text elements are created as a part of the Yjs document and are represented internally as sequences. Each text node can optionally have formatting information associated with it, and unless you are experienced with the internals of text editors the API for managing this can be quite intimidating. Fortunately, there are already a variety of open-source editors based on Yjs, so rather than having to manage text nodes and styles directly it is more practical to choose one of the existing editor bindings and adapt their examples to suit your needs.
The webxdc editor app can serve as an example of how to use both Prosemirror and the webxdc Yjs provider by simply passing in the entire Yjs document. Alternatively, the y-quill editor binding binds to a single instance of a Text type, which might be more appropriate if your app requires a number of collaborative text fields rather than a single shared editor.
XML
Yjs supports a number of other types related to XML:
Like Text, these types are very powerful, but they can also be quite difficult to use. They allow you to replicate a complex XML document structure made up of tags with arbitrary attributes and nested text nodes. Aside from the complexity of working with an arbitrarily complex tree structure, there are also possible security implications involved, as it might be possible for other users to inject scripts into such documents and trigger code execution on remote devices depending on your usage.
Testing
In most cases it will not be necessary to consider exactly how concurrent operations will be resolved, however, having a basic understanding of these principles may help avoid surprising edge cases. Yjs does a fairly good job of matching most people's expectations for how conflicts should be handled, but when in doubt it is best to test your assumptions explicitly.
It is possible to test different situations by instantiating two or more documents in a single script and manually applying operations in different orders to confirm whether the expected outcomes are produced.
import * as Y from 'yjs';

const docA = new Y.Doc();
const docB = new Y.Doc();

// define arrays to store each document's pending operations
const aOperations = [];
const bOperations = [];

// listen for update events and store them in the array
docA.on('update', (update) => aOperations.push(update));
docB.on('update', (update) => bOperations.push(update));

// copy references to both local arrays
const aList = docA.getArray('list');
const bList = docB.getArray('list');

// make concurrent overlapping changes to both arrays
aList.push([5]);
bList.push([7]);

// apply A's updates to B
aOperations.forEach(update => {
    Y.applyUpdate(docB, update);
});

// apply B's updates to A
bOperations.forEach(update => {
    Y.applyUpdate(docA, update);
});

// we expect A and B to be equal
// stringifying is a cheap way to compare object equality
// if we know their keys will be in the order
if (JSON.stringify(aList) !== JSON.stringify(bList)) {
    throw new Error("A and B did not converge!");
}

// it is not easy to know which of two outcomes will occur
// but we can prepare an array of valid outcomes
// and check that the eventual result is in that array
const expected = [
    [5,7],
    [7,5]
].map(array => JSON.stringify(array));

// throw an error if an unexpected result occurs
[
    aList,
    bList
].forEach(array => {
    const stringified = JSON.stringify(array);
    if (!expected.includes(stringified)) {
        throw new Error("CRDT output did not match expected values");
    }
});
Minimal test cases like this can confirm or disprove your intuition about how Yjs or any CRDT will perform in practice. This becomes increasingly important the more complex your document's structure becomes.
Nested structures
The Yjs docs describe another way of declaring shared types not demonstrated in the examples above:
// the basic way

// Method 1: Define a top-level type
const ymap = ydoc.getMap('my map type')
// Method 2: Define Y.Map that can be included into the Yjs document
const ymapNested = new Y.Map()

// Nested types can be included as content into any other shared type
ymap.set('my nested map', ymapNested)
This is one area where it might be particularly important to verify that different concurrent operations will behave as expected. For example, if one client adds a field to a nested map while another client deletes that map, then the addition of the new field will have no effect. Under most circumstances that will line up with people's intuition, but there are some surprising edge cases to consider.
One notable edge case occurs because Yjs does not provide a mechanism to express an intention to move a value from one location to another, instead forcing developers to delete from the original location and insert a copy at a new location. In applications where such a procedure occurs frequently it becomes more likely that one client's change will be silently dropped because another client moved an item.
Designing data structures
A well-specified document structure can make surprising behaviour less likely in an application. Consider a multi-user to-do list application, in which users can collaboratively create, move, and delete cards with a variety of data, such as titles, descriptions, expected completion dates, and a checkbox to indicate its completion.
One way to represent this data is an array of Maps.
[
    {
        title: "wash dishes",
        description: "don't forget the thermos in your bag",
        complete: false
    },
    {
        title: "water houseplants",
        description: "don't overwater the aloe or it will get mites",
        complete: false
    }
]
As mentioned in the previous section, reordering the "water houseplants" to the top position would mean deleting one and recreating it at the beginning of the array. If someone had watered the plants and updated the card concurrently with that move, their change would get ignored and it would remain in an incomplete state, making it likely that the plants would receive too much water.
An alternative structure which avoids this problem could look like this:
{
    order: [
        "025322791196985772",
        "34064380536730887"
    ],
    cards: {
        "025322791196985772": {
            title: "wash dishes",
            description: "don't forget the thermos in your bag",
            complete: false
        },
        "34064380536730887": {
            title: "water houseplants",
            description: "don't overwater the aloe or it will get mites",
            complete: false
        }
    }
}
This structure assigns each card a random id,
stores the values of its fields in a map
which can be referenced by its id,
and indicates cards ordering
by the id's position in the order array.
Removing an id from the order array
and reinserting it elsewhere will not affect the card's underlying data,
allowing for concurrent edits and move operations.
One side effect of this design is that
removing an id from the order array
will not automatically delete the associated data.
If this is overlooked then the data for old cards
might just build up over time.
This could be handled with an option to view archived cards,
possibly with an option to delete them.
This approach introduces the possibility for some new problems.
Two clients could create their own cards which share the same id,
in which case the data from one might overwrite that of another.
Similarly, the same id could be injected into two places in the order array.
It is hard to guarantee zero chance of a collision, but in practice they are incredibly unlikely to occur if the random ids are sufficiently long. They could be made even less likely by prefixing a per-user or per-device value to the id, along with some checks to ensure that an id is not known to be in use by any other clients before adopting it.
As for the matter of duplicate ids in the order array,
the rendering code which constructs the app's UI from this data
could ignore repeated elements when iterating over them.
Learning more
Many more examples can be found throughout the Yjs docs or by reviewing projects who have used Yjs (though not all of these are open-source).
There is also a forum where Yjs users and contributors can ask questions or share insights.
The author of Yjs has written and talked extensively about the library's design and implemention.
As for webxdc-specific implementation details, try the list of webxdc topic on the delta.chat forum.
There are also several existing CRDT-based webxdc apps which can be used as references:
- webxdc/editor (mentioned above) demonstrates the use of Yjs with prosemirror and the y-webxdc-provider
- webxdc/checklist uses the Automerge CRDT to implement a collaborative checklist
- webxdc/pixel implements a fixed-size bitmap data type with no external dependencies using Lamport Timestamps to resolve concurrent changes
Frequently Asked Questions
- TypeScript support to help avoid runtime errors
- Debugging your app in different environments
- Packaging and how to optimize app assets
- Compatibility with older devices and operating systems
- Storage related questions (IndexDB etc.)
TypeScript support
How to get autocompletion in your IDE via TypeScript?
Install the webxdc-types node package via npm
and follow the instructions in its README.
Alternatively, copy
webxdc.d.ts
into your source dir and follow the instructions below.
How to use webxdc types?
Start by importing the file.
In TypeScript:
import type { Webxdc } from './webxdc.d.ts'
In JavaScript:
/**
 * @typedef {import('./webxdc').Webxdc} Webxdc
 */
This works in VS Code nicely together with the //@ts-check comment on top of your source file.
If you want you can also type your own functions using JSDoc comments.
If you don't use VS Code you can still make use of the type checking with the TypeScript compiler:
npm i -g typescript # -g stands for global installation
tsc --noEmit --allowJs --lib es2015,dom *.js
How to add your own application update payload type?
If you have a type for your state update payloads, replace the any in Webxdc<any> with your own payload type:
declare global {
  interface Window {
    webxdc: Webxdc<any>;
  }
}
Debugging
Debugging With eruda.js
When you can not use debugging inside Delta Chat, either because you have no computer to connect to or if you are on iOS, you may try eruda.js as an alternative to browser-native debugging tools.
-
Download a standalone eruda.js
-
Copy
eruda.jsnext to yourindex.html -
Prepend the following snippet to the head section of your index.html:
<script src="eruda.js"></script>
<script>
  eruda.init();
</script>
When your webxdc app is started, a floating button will appear in a corner. Tap it to see the developer tools.
Debugging Inside Delta Chat
Debug a webxdc app in Android via Chrome DevTools
-
enable webView debugging in Delta Chat settings
Settings>Advanced>Developer Mode:
-
enable developer mode and ADB debugging on your device (go to system settings, device info, click 7+ times on build number until there is a toast telling you that you are now a "Developer", then go into the new developer menu and enable "ADB debugging", see also android docs: Enable ADB debugging on your device).
-
connect your device via USB to your computer
-
open chromium (or google chrome) and go to
chrome://inspect/#devices -
start your webxdc that you want to debug
-
click on
inspect:
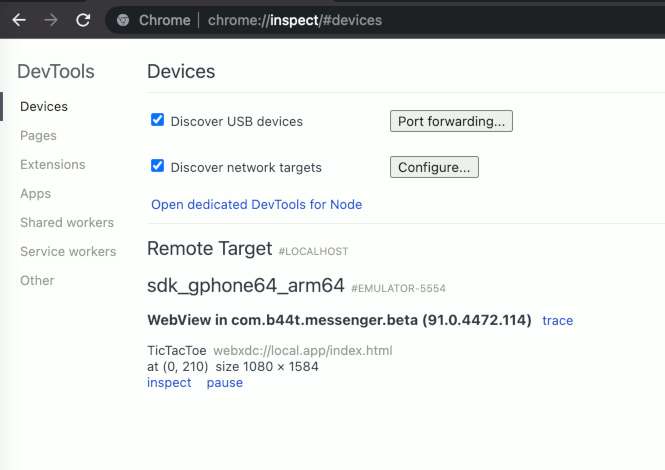
| Inpect HTML | JavaScript Console |
|---|---|
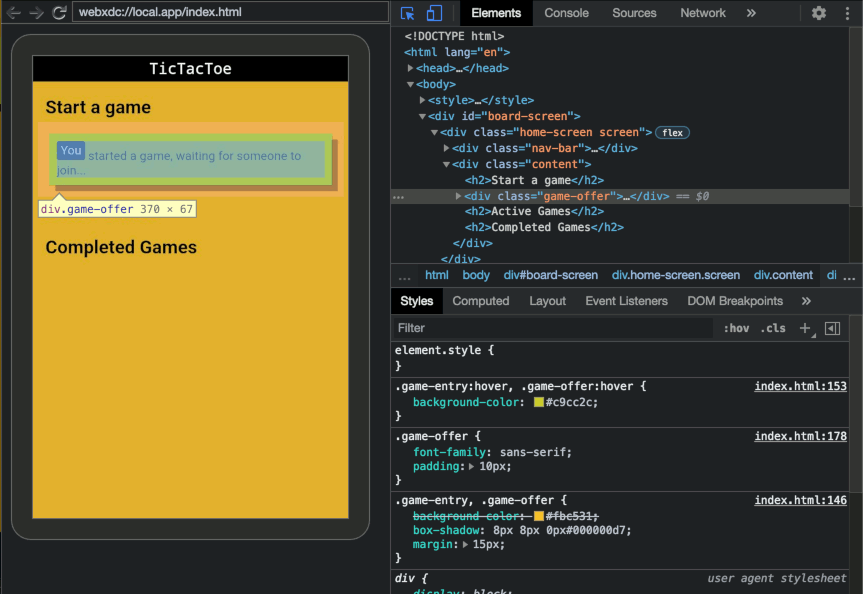 | 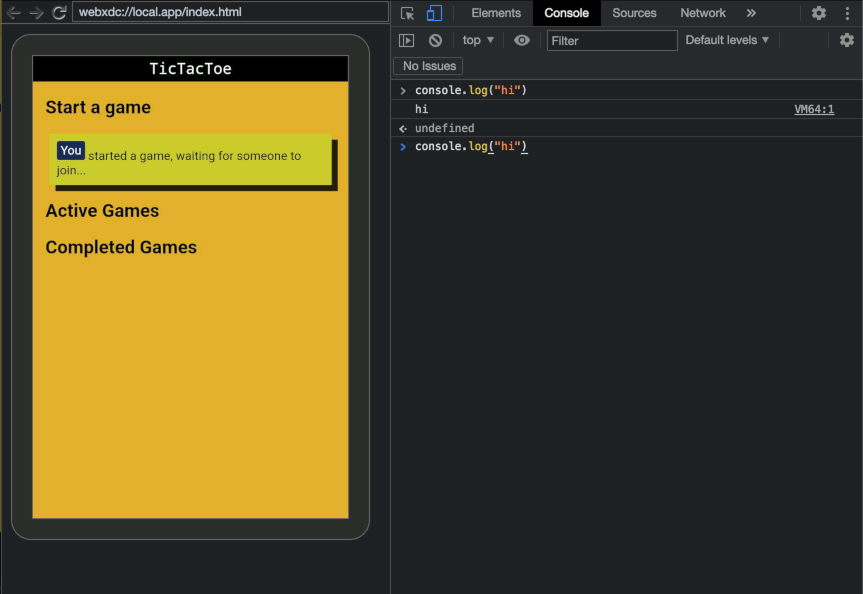 |
Make sure to disable adb debugging again after you are done with debugging!
Debug a webxdc app in Delta Chat Desktop
First enable the devTools for webxdc in the Settings:
Settings > Advanced > Experimental Features > Enable Webxdc Devtools
Note that you need to close and open any active webxdcs again for changes to take effect
Start the webxdc you want to debug and press F12 to open the developer tools:
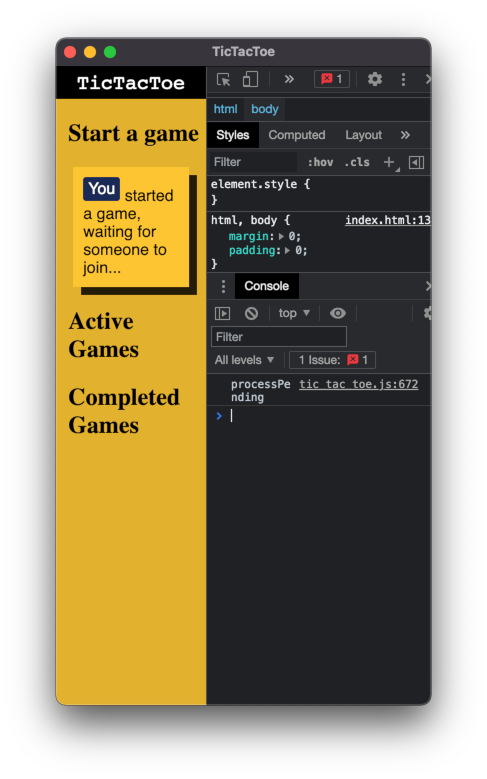
A bit small isn't it? fix it either by resizing the window's width or undock the developer tools:

I Cannot Share Variables on iOS Between Scripts!
Your code:
a.js
const CONFIG = { difficulty: "hard", hasCoins: true };
b.js
if (CONFIG.difficulty == "hard") {
  /** make the game harder **/
}
index.html
<html>
  <head>
    <!-- ... -->
  </head>
  <body>
    <!-- ... -->
    <script src="a.js"></script>
    <script src="b.js"></script>
  </body>
</html>
Basically you get many errors in your JS console like this:
Can't find variable: CONFIG
There are a few ways to solve this:
- use a bundle to bundle all your JS to one file (some bundlers: parcel, webpack, esbuild)
- use esm modules (see https://developer.mozilla.org/en-US/docs/Web/JavaScript/Guide/Modules)
- define your variables as inline script in your HTML file. (inline script means that the script is in the HTML file between the
<script>tags:<script>my code</script>) - append your global variables to the window object:
window.myVar = 1;and use them likeconsole.log(window.myVar)
Packaging
Optimizing Your App Icon
There are several things you can do to shrink down the size of your icon:
- save without thumbnail image (in gimp it can be done in the export dialog)
- shrink the image resolution (
256pxare enough, in some cases128pxor even lower like64pxcan sufice) - change your PNG colors from
RGBtoIndexed(in gimpImage->Mode->Indexed, see https://docs.gimp.org/en/gimp-image-convert-indexed.html)
For
pngyou can also use theoxipngtool (https://github.com/shssoichiro/oxipng), which automagically optimizes your icon's file size without quality loss:oxipng icon.png -s -o maxIf you have png files in your project, you should also do this them to safe even more bytes.
Noteworthy parameters:
--pretendonly calculates gains-Zeven more compression, but takes longer- for more info see
oxipng --help# Troubleshooting
Compatibility
Other APIs and Tags Usage Hints
Webxdc apps run in a restricted environment, but the following practices are permitted:
localStorage,sessionStorage,indexedDBvisibilitychangeeventswindow.navigator.language- internal links, such as
<a href="localfile.html"> mailtolinks, such as<a href="mailto:addr@example.org?body=..."><meta name="viewport" ...>is useful especially as webviews from different platforms have different defaults<input type="file">allows importing of files for further processing; seesendToChat()for a way to export files
Discouraged Practises
document.cookieis known not to work on desktop and iOS—uselocalStorageinsteadunload,beforeunloadandpagehideevents are known not to work on iOS and are flaky on other systems (also partly discouraged by mozilla)—usevisibilitychangeinstead<title>anddocument.titleis ignored by Webxdc; use thenameproperty frommanifest.tomlinstead- the latest JavaScript features may not work on all webviews, you may want to transpile your code down to an older js version e.g. with https://babeljs.io
<a href="https://example.org/foo">and other external links are blocked by definition; instead, embed content or usemailto:link to offer a way for contact- features that require user permissions or are enabled through the Permissions Policy may not work, Geolocation, Camera, Microphone etc.
window.open(),alert(),prompt(),confirm(), is known to not work on some implementations
Transpile Newer JavaScript With Babel.js
Older devices might not have the newest javascript features/syntax in their webview, you may want to transpile your code down to an older JavaScript version eg. with Babel.
Targets:
- Desktop (electron -> is chrome 91)
- iOS (iOS 11 -> webkit 604.1.38)
- android (android 5 -> the webview system component can be updated by the user: https://play.google.com/store/apps/details?id=com.google.android.webview)
If you want to use a newer API make sure to check on https://caniuse.com. If you just want to use newer JavaScript syntax, babel.js is the right tool for you - it translates new JS into older JS, that can be interpreted.
Questions about storing application state
Can I use localStorage or IndexedDB in my webxdc app?
Yes, you can use both localStorage and IndexedDB in your app but be aware of some limitations, especially during webxdc app simulation/development.
LocalStorage has a limit of 4-10MB which you can fill up quickly if not careful. IndexedDB is an alternative you can use that doesn't have this size limitation.
Note that browsers might reclaim storage for both localStorage and IndexedDB after a longer time of not using a webxdc app. If you want to safely persist data, you must send an application update which will be safely persisted by the messenger, and which also allows to use an app on multiple devices.
Why doesn't localStorage/IndexedDB work with some development simulators?
When you run your webxdc app with the hello simulator then all browser tabs share the same localStorage or indexedDB instance which is unlike when your webxdc app will be run by messengers. However, the webxdc-dev simulator manages to separate storage per webxdc app instance because each running app uses a separate localhost port for connecting to the webxdc-dev simulator server.
Are application updates guaranteed to be delivered to chat peers?
No, there is no guaranteed message delivery and also no feedback on delivery status. There is only a "best effort" approach. Messengers will typically queue messages and attempt delivery repeatedly.
If you want guarantees for peers receiving updates, you need to implement your own reliability protocol in your app. Common techniques include assigning sequence numbers or linked IDs to all updates you send, and implementing a way for receivers to request re-sending if updates are missing.
As with all "network synchronization" topics there are some theoretical limits. In particular it is useful to study and think about the Two-Generals problem and learn about existing "reliability layer" protocols before attempting to implement one yourself.